I LOVE beadboard. If we ever get to build a house someday it might all be decorated with beadboard. Our TV stand has glass doors and it was bugging me that you could see everything stuffed in there and all the cords. I bought some beadboard wallpaper on Amazon and mixed some dark brown and black paint from Home Depot and covered up the glass. It's taking a while to get used to; it's just a big black box now! But man it's so cute. Yay for cheap upgrades!!
I forgot to take a before picture with the doors on but this is basically what it looks like all the time.
I removed the doors and cut the wall paper to size. For a project like this that already had a wood frame, I had to cut the paper just a hair bigger than the size of the glass. The paper is hard to trim when it's soaking wet and has so much glue. It has to dry for 24 hours.
After!!! I am so happy with how it turned out! And the paint colors I mixed match perfectly! I'm amazed at how that worked out.
Showing posts with label home decor. Show all posts
Tuesday, July 11, 2017
Monday, February 20, 2017
Family Motto
Here's mine:
Breanne's and Ashley's
Saturday, December 24, 2016
Names of Christ Ornaments
Last year I saw these ornaments at Deseret Book and loved them. This year they were no longer available so I thought I'd try making them myself.
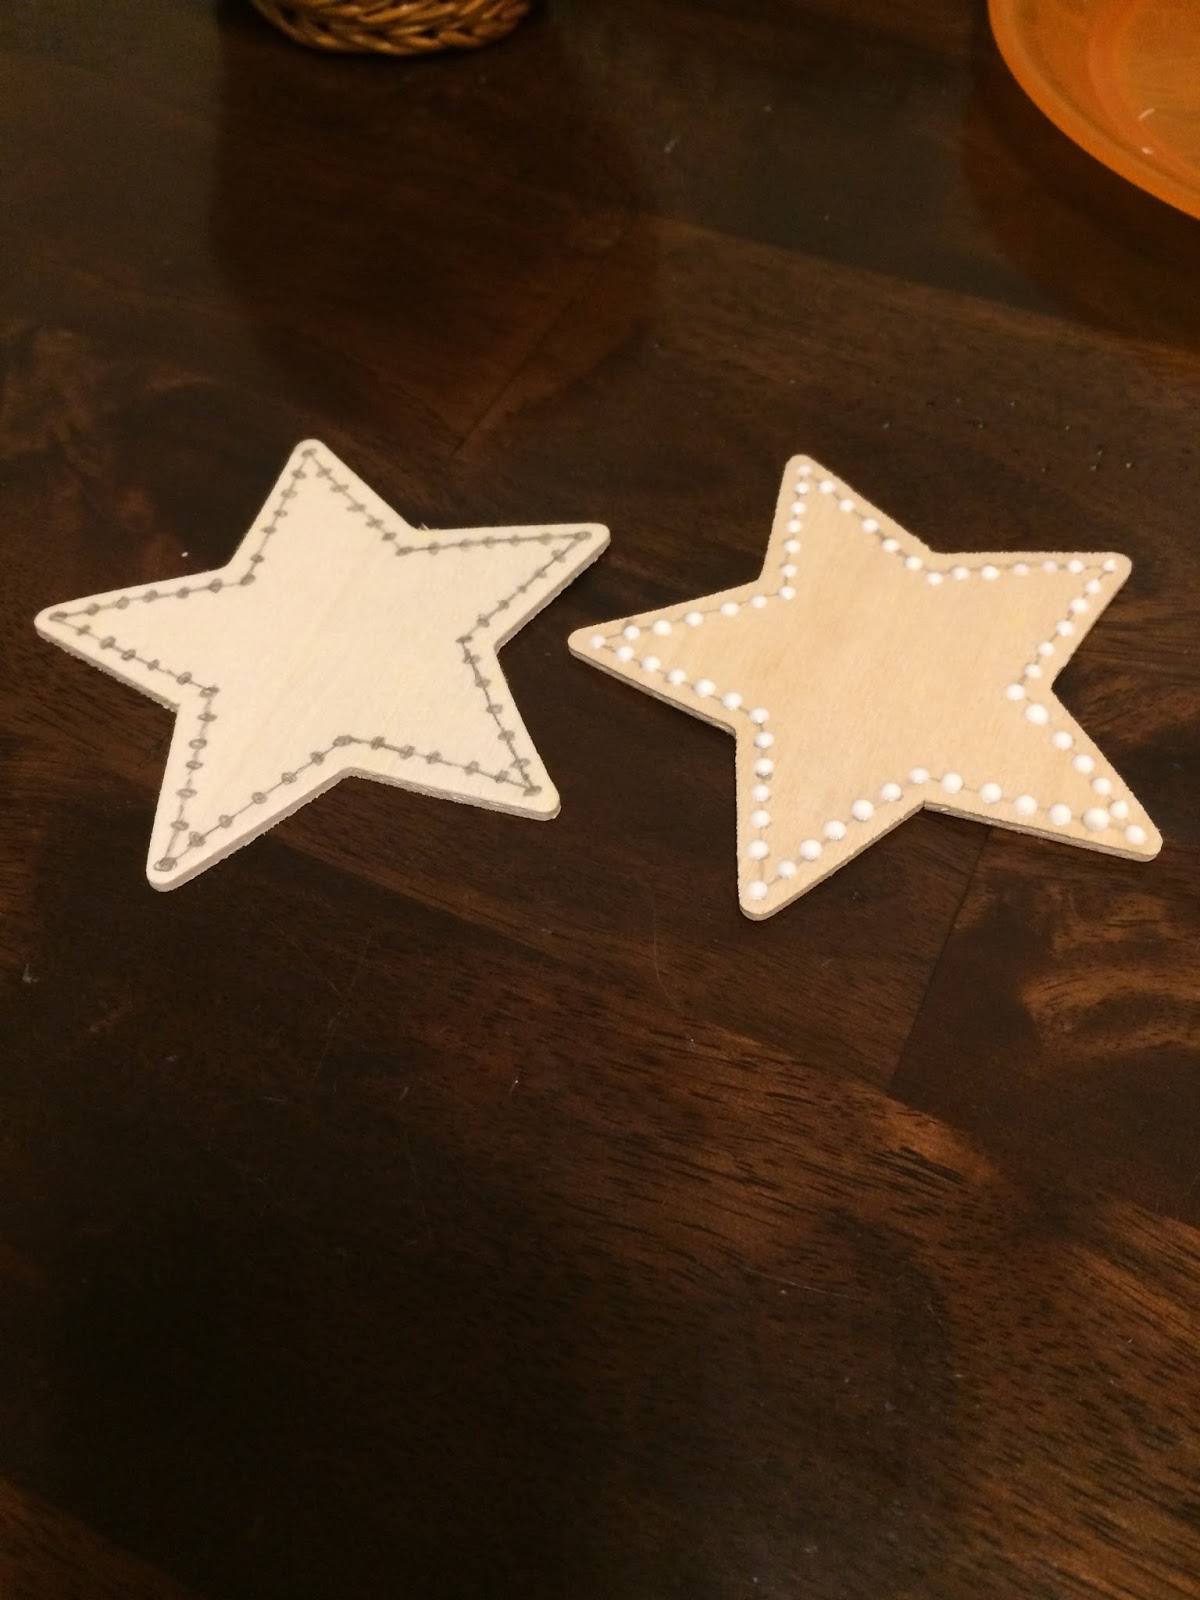
There were a few different ways I thought of doing these. I could have gotten a pack of star gift tags, or stitched on some felt. I chose to do wooden stars because I didn't feel like hand-sewing and the wooden stars were easier to find. I got 2 packs of wooden stars for like $2 each, a small can of metallic silver spray paint ($3), and puffy paint ($1).
I drew where I wanted the little dots to go and then used the puffy paint. Hand cramp!
Then I spray painted them. I learned that the vinyl doesn't stick as well to that metallic paint. I sprayed a coat of clear acrylic spray and then the vinyl stuck better. I made a couple extra ones with a nativity scene on them for a few of my friends. And one more coating of the clear acrylic spray. I hot-glued a loop of jute to the back and hung them on the tree. Yay!
There were a few different ways I thought of doing these. I could have gotten a pack of star gift tags, or stitched on some felt. I chose to do wooden stars because I didn't feel like hand-sewing and the wooden stars were easier to find. I got 2 packs of wooden stars for like $2 each, a small can of metallic silver spray paint ($3), and puffy paint ($1).
I drew where I wanted the little dots to go and then used the puffy paint. Hand cramp!
Then I spray painted them. I learned that the vinyl doesn't stick as well to that metallic paint. I sprayed a coat of clear acrylic spray and then the vinyl stuck better. I made a couple extra ones with a nativity scene on them for a few of my friends. And one more coating of the clear acrylic spray. I hot-glued a loop of jute to the back and hung them on the tree. Yay!
Thursday, July 2, 2015
Piped Pillow Cover
Piping can be evil. I tried making my own and that did not go well. So glad I can pay to have someone make it for me :)
Anyway, I made these pillows to go on our new bedspread that I made (pics of that coming soon). I saw a tip on Pinterest to cut a king-sized pillow in half to make two throw pillows. Pillow inserts can be so expensive! This cost me less than $10 to make two. So cool.
My pillows measured 17x17 inches. So I cut my fabric 18x18. I also used interfacing for the first time. Awesome!! I followed this tutorial from Make It and Love It. I LOVE how they turned out!
Anyway, I made these pillows to go on our new bedspread that I made (pics of that coming soon). I saw a tip on Pinterest to cut a king-sized pillow in half to make two throw pillows. Pillow inserts can be so expensive! This cost me less than $10 to make two. So cool.
My pillows measured 17x17 inches. So I cut my fabric 18x18. I also used interfacing for the first time. Awesome!! I followed this tutorial from Make It and Love It. I LOVE how they turned out!
Thursday, June 11, 2015
Stencil Art
These stencil projects are so much fun. And they turn out awesome! I'm considering selling them on Etsy. I followed the same process as the bird art I did a little while back. I bought the burlap canvas at Walmart for I think $5. I also bought a staple gun to attach the ribbon. Hot glue just doesn't cut it. Having a staple gun opens up a lot more possibilities for me now! Plus I feel pretty awesome using a staple gun.
Thursday, May 21, 2015
Padded Placemats
We bought a new kitchen table a few months ago. It's so beautiful and counter-height, which I love so much. However, kids are kids and they have managed to scratch it up. And Sean and I have, too. Oops. We have been searching and searching for cute protective placemats to keep on the table at all times. Nothing is out there. So I made some. This was a great project because I learned more about sewing products I have never used before: interfacing.
For more information on interfacing, please go here. I love her blog so much.
So, I started out making these placemats using quilt batting hoping it would provide some stabilization to the placemats. It ended up making them pillowy. So I read up on interfacing. I was at Joann's looking at all the different options for interfacing and found a foam stabilizer. Eureka! Washable, protective padding. (The link is for a whole bolt of foam but I was able to find it in store by the yard.)
I bought 2 1/2 yards of home decor fabric. (I've heard outdoor fabric is a good option, too, because its thick and spill-proof.) I also bought 2 1/2 yards of foam. (I really only needed 1 1/4 yards).
I cut two pieces of my fabric 19x13 inches and one piece of foam the same size. Sew the foam to the wrong side of one piece of fabric. Sew right sides together and then turn right-side out. Iron and top-stitch. I got 6 placemats from this fabric. Oh, and I just had a thought that you could use the foam to make your own mouse pad...
For more information on interfacing, please go here. I love her blog so much.
So, I started out making these placemats using quilt batting hoping it would provide some stabilization to the placemats. It ended up making them pillowy. So I read up on interfacing. I was at Joann's looking at all the different options for interfacing and found a foam stabilizer. Eureka! Washable, protective padding. (The link is for a whole bolt of foam but I was able to find it in store by the yard.)
I bought 2 1/2 yards of home decor fabric. (I've heard outdoor fabric is a good option, too, because its thick and spill-proof.) I also bought 2 1/2 yards of foam. (I really only needed 1 1/4 yards).
I cut two pieces of my fabric 19x13 inches and one piece of foam the same size. Sew the foam to the wrong side of one piece of fabric. Sew right sides together and then turn right-side out. Iron and top-stitch. I got 6 placemats from this fabric. Oh, and I just had a thought that you could use the foam to make your own mouse pad...
Tuesday, March 10, 2015
Entryway shelf Decor
Not exactly sure if this belongs here but I just love how this turned out and I gotta share. I have been searching and searching for the pierfect shelf/coat rack for our entry way. I needed something functional and pretty. I FINALLY found a great one at Joann's for half off. I made the doily jar (I used 4" doilies) and framed quote to go on top. I just love to look at it.
Burlap Canvas
Framed Monogram Letter
I think monogram is the correct name for this project. This was so much fun to put together. I found the cool shadow box and wodden letter at walmart. The burlap-type background "came with the frame." I painted the letter white and then mod podged scrapbook paper to the front. I added an adorable fabric flower (tutorial found here) and hot glued the whole thing to the frame. It's so happy!
Monday, February 16, 2015
Split panel Bird Wall Art
This was such a fun project. I love creating things that people love. Katy needed some kind of art on the bare walls of her room. It's pretty self-explanatory, I think. Katy got to help me glue on all the leaves and chose where the sun would go. She loves the pink kissing birds and all those sparkles!
Friday, January 23, 2015
Simple Tie-up Valance
I've been trying to figure out a way to dress up our kitchen bay window. We get such good light from this window that I didn't want to block out but it needed a little something on there. I found this adorable looking kitchen valance online ($40 for one panel! Yikes!) and thought I could duplicate it pretty well.
I bought a simple room-darkening curtain panel at Walmart for $7 and a couple of spools of ribbon for $4. I wanted the length of my curtains to be 18". The middle curtain is 54"x 18" and the smaller curtains are 23"x 18". I added 2" to the length so I could fold over the hem.
I read on a valance tutorial for this type of curtain to make the ribbon 2/3 the length of the curtain. I hot-glued the ribbon into a loop and attached a bow to the seam. Loop the ribbon onto the curtain and hang it up.
My middle window is pretty wide so I put three ribbons on it.
I bought a simple room-darkening curtain panel at Walmart for $7 and a couple of spools of ribbon for $4. I wanted the length of my curtains to be 18". The middle curtain is 54"x 18" and the smaller curtains are 23"x 18". I added 2" to the length so I could fold over the hem.
I read on a valance tutorial for this type of curtain to make the ribbon 2/3 the length of the curtain. I hot-glued the ribbon into a loop and attached a bow to the seam. Loop the ribbon onto the curtain and hang it up.
My middle window is pretty wide so I put three ribbons on it.
And here's a picture of the one from the store. Not bad right???
Friday, December 26, 2014
Airplane mobile
For Christmas I got a Silhouette Cameo! I love it so much! I have so many more crafting options than I did with the Cricut. The Cricut was a great tool but very limited in what and how you create. My first project was cutting these 3D airplanes to hang in Brandon's room. I LOVE how they turned out!!! And it was so easy. There are so many possibilities for me now!
This is Brandon's view from the bed :)
Friday, November 21, 2014
Burlap Christmas Wreath
I've seen burlap coming up all over Pinterest for home decor stuff and I just love it. And I LOVE this wreath. I wanted to do a burlap/lace Fall wreath but I ran out of time to do that. This was such a fun, cheap project and I love how it turned out. I bought a moss/grass wreath for $5 and wrapped it twice with some burlap ribbon ($3.50). Then I added some white poinsettia flowers, pine cones, holly leaves, holly berries, and ribbon ($3) with lots and lots of hot glue. I couldn't wait until next week to hang it up so, yes, it's hanging on my door now before Thanksgiving :)
Sunday, April 6, 2014
Lamp shade makeover
I've had this table lamp for a little while and have wanted to recover the shade. It's in good shape but I didn't like the red. Not my style. And the more I looked at it the more I disliked the shape of it, too. So I chose to just buy one and dressed it up a bit. I bought a burlap lamp shade and a spool of ribbon for $12.
| The switch was simple because this lamp shade just lifts right off the base |
| I marked 1/2 inch on top and bottom and used hot glue to attach the ribbon |
| Fold over the end of the ribbon at the seam |
| I also added an adorable bow! |
| After. I love it! |
Wednesday, April 3, 2013
Flower Knobs for Dresser
Loved this project! And it cost me all of $2. I heart the dollar store.
I bought two flower bunches at the dollar store then pulled the flowers off of the stem.
Then I pulled apart the centers of the flowers.
And the rest I think you can figure out.
I bought two flower bunches at the dollar store then pulled the flowers off of the stem.
Then I pulled apart the centers of the flowers.
And the rest I think you can figure out.
Monday, January 14, 2013
Tissue Paper Pom-Poms
Breanne has these up in her new nursery and I just love em. I wanted to hang some in Katy's room and I found instructions on how to make them here. I sorta love Martha Stewart. Mine, of course, didn't turn out as pretty as the ones in the pictures but they still look cute. I hung them up with white thread and tape on the ceiling.
Saturday, January 12, 2013
Coat Rack
The kids offically needed their own coat rack. That way Brandon can get and put away his own coat and our bigger coat rack can have a little more room for when people come over who need to hang their stuff up.
I was inspired by this Etsy shop and I knew I could do the same thing with my Cricut! I let Brandon pick his favorite animal for his coat rack and he chose a jelly fish. Underwater theme! It was a lot more time consuming than I thought it would be but it was totally worth it! I glued each image on with just regular old Elmer's glue and then sprayed on a clear sealant to protect the paper and paint.
| Don't you love the little toadstools?? |
Subscribe to:
Posts (Atom)