
Showing posts with label ModPodge. Show all posts
Showing posts with label ModPodge. Show all posts
Wednesday, March 6, 2013
Mason Jar gift/scrapbook paper lid
I finally found a use for all those jars I've been saving up. I dressed up the jar with scrapbook paper and made a cute label with Microsoft word (inspiration for that here). I found a tutorial for covering a mason jar lid with scrapbook paper too and found that here. I LOVE the way it turned out. I filled the jar with Brownie mix and that recipe can be found on my food blog, here.


Thursday, August 2, 2012
BOO sign
My mom has one of these and I think it was my favorite Halloween decoration. Probably because it wasn't scary :) I was inspired by this post. So I bought some wooden letters at Joann's, painted the letters to match the paper and modpodged the paper to the letters. Then I tied them together with jute. I LOVE it!! I love Fall....


Monday, February 13, 2012
Cell phone holder
This was a cool little project that I got from here. She uses an old lotion bottle. I tried a couple different containers and the best one that worked for me was an old bottle of chocolate syrup. I've been wanting to make one ever since I accidentally vacuumed up the cord to my phone charger...ahem...
So, here's the before:


So, here's the before:


And after...

Thursday, February 2, 2012
I love you because...
I think I'm starting to have a pack-rat problem. I have a hard time throwing stuff away because I know there must be some kind of other use for it. I had a couple of 5x7 picture frames that broke except for the glass. I had no idea what I would ever do with a small piece of glass. But my sister-in-law made a cute "i love you because" dry erase board that totally inspired me. (Thanks Breanne!) I Modpodged a printed piece of paper to the frame and hot glued on some ribbon to hang it with. This will be so fun!


Tuesday, January 31, 2012
Mod Podge Lamp
Back when Brandon was born we bought a little desk lamp for his living room/bedroom. We are using it for Katy now and it is SO boring. And after packing it in boxes so many times it's gotten a little dinged up.
I wanted a way to glam it up and still have it give off the same amount of light. I found some beautiful lace fabric and some ruffle trim at Walmart.

I mod podged the lace to the lamp shade, used hot glue to attach the ruffle and now it is so adorable!

 |
| Before |
I wanted a way to glam it up and still have it give off the same amount of light. I found some beautiful lace fabric and some ruffle trim at Walmart.

I mod podged the lace to the lamp shade, used hot glue to attach the ruffle and now it is so adorable!
 |
| After! |

Friday, January 27, 2012
V-Day Wreath
This was a fun little project. I've noticed there's been a trend going on in the craft world for seasonal wreaths. I was getting kindof annoyed with it but then I kept seeing so many cute ones! So, I embraced it. This Valentine's Day Wreath was the first of, hopefully, many that I will make. Be prepared to have a lot of time and glue on your hands for this project. I got the tutorial here. I tried to take my own pictures for you but my hands were so sticky! (In the tutorial she uses just regular school glue but I found it was easier to just use Mod Podge). So here is the finished project. It didn't turn out quite the way I was expecting but it's still pretty darn cute.


Tuesday, January 10, 2012
Printables
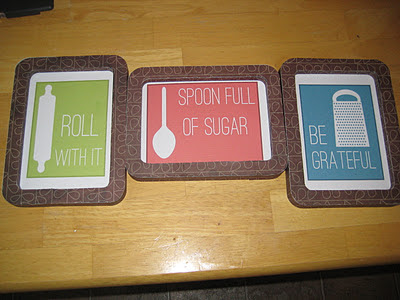
I've been wanting to get some cute art for my kitchen but was having trouble finding anything I liked. Then I fell in love with these cute printatbles that I found on Pinterest. I had some plain frames packed away and covered them with scrapbook paper (like I've previously done here). Only I used an acrylic sealer spray instead of the cream since I couldn't find my paint brushes. And as it turns out, the spray was so much easier to use than the cream and doesn't make the paper bubble. However, the fumes are very strong so be sure to have your area well ventilated. Here is the finished product!


Tuesday, December 27, 2011
Mail holder
Mail holder made from an oreo box and scrapbook paper. Magnets on the back.
 |
| BEFORE |
 |
| AFTER! |
Sunday, December 18, 2011
Christmas Ornaments
Last year we bought some ornaments at Walmart but never ended up putting them on our tree. I pulled them out again this year and just couldn't put them up on our tree. They're so boring! I have an old hymn book that I just couldn't throw away so I tore out all the Christmas songs, cut them into strips, and you guessed it, mod podged it to the ornaments. Then I added some glitter and ribbon and....

They turned out so beautiful. I love them!

They turned out so beautiful. I love them!
Friday, December 16, 2011
Spice rack makeover
I'm so proud of this project because I didn't need Pinterest to be creative for me. I came up with this all on my own! My spices were in desperate need of a makeover. So I used my Cricut to cut out 1 1/2" circles. I printed out the words on the computer and glued them to the circles. Then I Mod Podged the circles to the container and voila! They're so cute now and SO much easier to read.
 |
| before |
 |
| after |
Saturday, December 10, 2011
Fabric Magnets
This was one of those projects (that I got from Make it and Love it of course) that makes you think, "Why didn't I think of that??" So easy and so obvious. Our fridge is so cute now :)


Sunday, December 4, 2011
Merry Christmas Board
A few years ago my sister Angie and BIL Joe gave me this Halloween "Spooky" board since one of my nick names is Spooky. But then I got another Halloween decoration as a gift that said Spooky too. So, I took the one that J+A gave me and gave it a face lift for Christmas. (Don't be mad!!)
I used tissue paper and Mod Podge to cover it and then used my Cricut for the letters and images. I kinda love it :)
 | |
| BEFORE |
I used tissue paper and Mod Podge to cover it and then used my Cricut for the letters and images. I kinda love it :)
 |
| AFTER! |
Friday, July 1, 2011
Crafty Flag
A few weeks ago I bought a baby book for baby girl and saved the box it came in. I knew it would be useful for something. I trimmed down the sides and turned it into a crafty patriotic flag using mod podge (of course) and a foam star sticker. Pretty fun :)


Tuesday, June 28, 2011
4th of July decorated jars
I've had this project on my mind for a few weeks now. I originally wanted to spray paint them but I figured tissue paper would give the same effect and it's a lot cheaper too. So, I did just that. I mod podged tissue paper to the jars (old spaghetti sauce jars) and then added some ribbon to the rim of the jar. I bought a 4th of July decoration forever ago that was like half off but wasn't really sure what to do with it. *Lightbulb* So I took it apart and attached it to the my jars. I also put some battery operated tea lights inside. Love them!


Saturday, May 21, 2011
Mod Podge Headband
I've been wanting to get some cute headbands for a long time now since they are so in style and so cute. But all the ones I found at the store weren't cute at all... Then I had an idea. *lightbulb* Why don't I just decorate some plain headbands? Then I can make them look however I want them to!
I bought a 3-pack of headbands and Walmart for about $4 and got out some scraps of fabric. I cut a strip of fabric 1 1/2 inches wide and 14 inches long, enough to completely cover the headband.

Then I applied Mod Podge to the outside and edges of the headband and stuck the fabric on.


I applied more Mod Podge to the fabric when it was secured to the headband.

I knew I had seen a way to make fabric flowers but I was having trouble finding some tutorials. I found this video that showed a very simple way to make some! She uses fabric glue and I would probably recommend that too because I burned myself a few times using my hot glue gun. But that worked perfectly too. Whatever you have on hand.

When the headband was all dry I hot glued my flower to it. Here it is! It's too bad none of my maternity clothes go with this headband... Oh wait, I have 2 more headbands to make!

I bought a 3-pack of headbands and Walmart for about $4 and got out some scraps of fabric. I cut a strip of fabric 1 1/2 inches wide and 14 inches long, enough to completely cover the headband.

Then I applied Mod Podge to the outside and edges of the headband and stuck the fabric on.


I applied more Mod Podge to the fabric when it was secured to the headband.

I knew I had seen a way to make fabric flowers but I was having trouble finding some tutorials. I found this video that showed a very simple way to make some! She uses fabric glue and I would probably recommend that too because I burned myself a few times using my hot glue gun. But that worked perfectly too. Whatever you have on hand.

When the headband was all dry I hot glued my flower to it. Here it is! It's too bad none of my maternity clothes go with this headband... Oh wait, I have 2 more headbands to make!

Friday, February 18, 2011
Coat Rack Hanger Thing...
This is another make-over item that used to hang in my old room.

First I had to pry off all those wooden letters of my name. Then I had to scrape off any big chunks of glue and then sand the rest of the glue off. Took forever!
Then I painted it black and Modpodged some decorative tissue paper to the front. The letters are vinyl. Then I bought some hooks at Walmart and voila! I don't know what the technical name for this is though....


First I had to pry off all those wooden letters of my name. Then I had to scrape off any big chunks of glue and then sand the rest of the glue off. Took forever!
Then I painted it black and Modpodged some decorative tissue paper to the front. The letters are vinyl. Then I bought some hooks at Walmart and voila! I don't know what the technical name for this is though....

Thursday, February 3, 2011
Welcome Board
When I was in Young Women's I got this board with President Hinckley's Bs and I've always loved it. But it belongs in a 16-year-old girl's room. Since I'm not 16 anymore and I have a family I thought maybe I could give it a face lift to make it more fitting for our home. (Thanks, Mom, for bringing this up to me.)
Unfortunately, I didn't have the patience to glue on all those letters by hand. Maybe another time I will display Pres. Hinckley's Bs. So after a few coats of paint, some scrapbook paper and Mod Podge here is what hangs in my home now. I heart it.
Stay tuned for another make over of something that would belong to my 16-year-old self!
 | |
| Before |
 |
| After! |
Thursday, January 6, 2011
ModPodge Frame
We've had these frames ever since we got married. In fact, I think Sean's parents got them to use at our reception. Anyway, I had this genius idea to modpodge scrapbook paper to the front to make them cute. I used to do this all the time with my mom and sister when I was younger.

Start off with your frame and trace the outside and inside onto the back of your scrapbook paper.

 Then cut out your tracing and apply Mod Podge liberally to the front of the frame. Lay paper over the frame. It might bubble a little bit and just do your best to smooth them out. Then add another layer of Mod Podge to the paper.


Start off with your frame and trace the outside and inside onto the back of your scrapbook paper.


In the end your project should look like this. Totally fun and cute.
Saturday, November 20, 2010
Give Thanks
This was a super fun project. And inexpensive. I bought a wood plaque ($6.99) at Roberts. Painted it brown ($1.00). Mod Podged (I already had some but you can get a small bottle for $5) some Thanksgiving paper on. Then used my Cricut for the letters and leaves. Bought some ribbon at Walmart (for 37 cents a yard) and hot glued it to the board. I had some ribbon left over and made a bow. Oh, and I also used some sand paper to even out the edges of the paper after they were all glued on. I just love it so much! I only have a week to enjoy it though...


Total cost: $8.36 (if you buy Mod Podge it would be about $14)
Saturday, October 16, 2010
Jar-o-lanterns (haha)
More non-scary Halloween decorations. I got this idea from Taste of Home magazine and I LOVE them. Choose jars of various sizes (I used old pickle jars). Brush a coat of Mod Podge on the jar. Then cover the entire jar, including neck and bottom, with layer of tissue paper. I would recommend covering half the jar rather than the whole jar. Easier to work with. Slather the tissue paper with another layer of Mod Podge. You can wrap ribbon around the neck but I didn't have any. I got the faces from tasteofhome.com/lantern or you can make your own. Cut them out and use more Mod Podge to attach them to the jar. I bought some battery-operated tea lights at Walmart for $2.50 to put inside. Or you could fill them with candy. Cute right? This was a very cheap project. I think I will make some for Christmas too!


Subscribe to:
Posts (Atom)