Showing posts with label re-purposing. Show all posts

Friday, December 22, 2017

Dollhouse

At the end of August I started working on this project. I really wanted Katy to have a dollhouse but didn't like most of the ones from the store. My mom offered me part of a dollhouse that I grew up playing with. I was so excited to re-build and modernize a toy I loved playing with. I decided to removed the slanted roof and make it 3 stories.


We had some leftover MDF board from a previous project so that was nice to not have to go out and buy more wood. I took the whole thing apart and measured everything. Sean used his dad's power saw to cut the pieces I needed.

Putting it back together was a lot harder than I thought it would be. I used nails to secure everything and it is so hard to nail two pieces of wood together at a right angle! Eventually I got it rebuilt and painted.


And added new wallpaper and flooring with scrapbook paper and modpodge. The carpet is bathroom rugs.

And Popsicle stick baseboards :)

The furniture was sooo fun to make!

The couch and chair were made with thin pieces of craft wood and wooden spools. I layered thin foam for the cushions and covered with fabric.


 The big beds I painted and made mattresses with the foam.

 I also made blankets and pillows.
The toilet. It was so hard to find a dollhouse toilet!!! And there was no way I could make one that would be sturdy enough for playing. I found this beauty at the gas station for $1!

I cut the bottom of a bottle of Miralax for a tub and glued beads to the bottom for the feet.

Some scrap pieces of the MDF and dowels and Popsicle sticks. I also made mattresses for these.

I love the sinks! I cut and painted an iPhone box and used a condiment container for the bathroom sink. The faucet is a hook painted silver. The pink sink is part of a mini dollhouse Katy had.


 Blood, sweat and tears went into this project. I hope this is something Katy will enjoy for a loooooong time! She has seen the progress of the house but I keep telling her that I'm fixing it up for Grandma. There's not really a space for me to hide it from her! I'm excited to see her reaction on Christmas and to play with it with her! :)

Tuesday, July 11, 2017

Beadbaord!

I LOVE beadboard. If we ever get to build a house someday it might all be decorated with beadboard. Our TV stand has glass doors and it was bugging me that you could see everything stuffed in there and all the cords. I bought some beadboard wallpaper on Amazon and mixed some dark brown and black paint from Home Depot and covered up the glass. It's taking a while to get used to; it's just a big black box now! But man it's so cute. Yay for cheap upgrades!!

I forgot to take  a before picture with the doors on but this is basically what it looks like all the time.

I removed the doors and cut the wall paper to size. For a project like this that already had a wood frame, I had to cut the paper just a hair bigger than the size of the glass. The paper is hard to trim when it's soaking wet and has so much glue. It has to dry for 24 hours.

After!!! I am so happy with how it turned out! And the paint colors I mixed match perfectly! I'm amazed at how that worked out.


Wednesday, April 22, 2015

Doll Stroller Makeover

Not very long ago I bought one of those doll strollers for Katy. It lasted about a week before it got rips and tears in it. The fabric they used on it was so flimsy! I know I've seen people make over a little stroller like this one so I thought I'd give it a try. It's so so so important to take pictures of the old stuff so that you know how to put it all back together. I should have taken way more. But it turned out so cute! Brandon and Katy helped pick out the fabric and I used all the original binding and other pieces from the stroller. I've seen people spray paint the rods and handles a new color but I didn't have the patience for that :)

Before


Took everything apart

Traced the old pieces onto the new fabric

Started piecing everything back together.

Sewing the trim back on (the middle buckle piece shouldn't go there. It goes on the purple piece)

Iron hem 1/4 inch and 2 3/4 inch

Sew pockets for stroller rods to fit on. 2 1/2 inches on each side.

Attach bottom piece to top piece


Sew trim around bottom piece

Tada!


Monday, December 8, 2014

Fabric Ornaments

Loved this project. And I got to use some of my cute Christmas fabric scraps and cover some of our existing ornaments. This cost me a total of $1 for the ornament hooks. Found the tutorial here. She says to use a 13x13 square piece of fabric but I thought that was a little big. I think mine were 10x10 or maybe even smaller. I'm considering recovering my music note ornaments with music fabric....


Wednesday, March 6, 2013

Mason Jar gift/scrapbook paper lid

I finally found a use for all those jars I've been saving up. I dressed up the jar with scrapbook paper and made a cute label with Microsoft word (inspiration for that here). I found a tutorial for covering a mason jar lid with scrapbook paper too and found that here. I LOVE the way it turned out. I filled the jar with Brownie mix and that recipe can be found on my food blog, here.


Tuesday, December 11, 2012

Nativity Board

Do you remember this Christmas board make-over I did last year? Yeah, it's cute and all but it wasn't doing it for me this year. I don't have a nativity at all and I wanted a way to display it without having to worry about losing any of the pieces over the years.

An idea I got from Pinterest here  helped me accomplish this.

I used Google to help me find silhouette Nativity images and printed them. Then I had to cut them out by hand onto white contact paper. (I would not recommend cutting this many detailed images by hand...)


 I also learned a great trick through Pinterest (can't find the source though) that has opened up a whole new world of crafting for me. Pencil transfer stencil is a good name for it, I think.

First, print out your desired phrase and font and cut out

On the reverse side, color over the words with pencil

Lay your phrase on your project and trace over the letters

The pencil scribbles on the back get transferred onto your project!

I used glitter gold 3D Paint over my letters. SO pretty!

Thursday, September 20, 2012

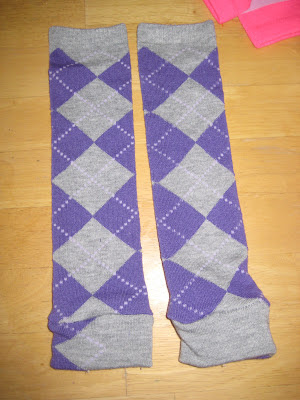
Baby Leggings

I always thought these were kinda funny but now that I have a daughter and it's getting colder, I'm finding that these should be a staple in her wardrobe. So cute for wearing under a dress/skirt for church and convenient for wearing around the house on a cold day.

This was a super quick and easy project. I got this great tutorial here. I bought some women's knee socks at walmart for $2 each. I wanted to get her some plain colors too and the men's sock section has a few options but they all came in a 3-pack and were a little more than I could spend at the time. Next time.


Adding the cuffs on the bottom made these a little long for her. I saw another tutorial here that shows you how to ruffle the bottom of the sock. I will be trying that next time, too. :)

Wednesday, August 1, 2012

Baby Skirt

I got tutorials for this skirt here and here. I took one of my old shirts that I ripped a hole in a while ago. This was a super simple project that took less than an hour.


And turned into this. Yay!!