Saturday, December 25, 2010

Sweater Pillow

This was a fun project. And I actually did it a couple of weeks ago but I couldn't post it because it was a Christmas gift for my parents so I didn't want them to see it. I was inspired by this post of my favorite craft website. It gives all the instructions. And I did the embroidery a few years ago and didn't know what to do with it. *Light bulb* So, I found some old sweaters (that I think I stole from my sisters...sorry Leash. Don't be mad.) and I found a little travel pillow that I bought a while ago to use for Brandon.

I don't remember the dimension of the pillow but, like the tutorial, the fabric should be 1 inch bigger than the pillow, all the way around.


It's just so pretty. And so comfortable to hold. I mean, it's like wearing a comfy sweater. I love it. Merry Christmas, M&D!
Front

back

Thursday, December 23, 2010

Painted cutting board

My mom got me doing this project when I was a teenager and I love it. I made one a few months ago while staying at mom's. She was nice enough to buy me extra cutting boards that I could do at home and give as gifts. What a great neighbor gift right? Or wedding gift. Or birthday gift! Totally cute and fun.

To start off, I just googled images of fruits and veggies and printed them off. Then you trace the image on the back side of the cutting board with a black permanent marker (The side you cut on should be face down.)

The image will be mirrored from the front/cutting side.

Then use regular old acrylic paint. You may have to do 2 coats with some colors. When it's dry, spray a clear acrylic sealer over the paint to keep it from coming off. I've learned that it takes a couple of hours for it to really set and not scratch off.


Here are all the finished products! The orange and pear are my favorite!!!

Thursday, December 9, 2010

Wise men still seek Him

I love embroidering. I got this idea from a Christmas decoration my MIL (mother-in-law) has upstairs. And I got the design from here. Lots of cute ideas. I may have to do another embroidery. I love embroidering.
This frame I bought didn't come with any backing so I just cut a piece from an old box of diapers to fit the back and hot glued the fabric to it.

Monday, December 6, 2010

More Felt Christmas Ornaments

Totally simple and fun. And didn't cost me a thing. The reindeer and snowflakes I cut out with my Cricut (actually I cut it out on paper and then traced it on the felt). I got the gingerbread man image on line. I used that 3D fabric paint again on these ornaments.To hang them I will probably just thread some string through the top and knot it. Or you could hot glue some cute ribbon.

Saturday, December 4, 2010

Felt Christmas Ornament

I found the tutorial for this project here. Except I didn't sew down the middle of the circles. I just used hot glue. It was fun and simple and didn't take too long. My circles were 4 1/2" and it was a little big and I'd say 4" probably would be best, in my humble opinion.

Monday, November 29, 2010

Snowman Advent Calendar and Marker

I think this is my favorite Christmas decoration! Well, next to my stockings of course. This was so easy and fun! And cheap! I found these great felt squares at Hobby Lobby in Orem which is what inspired the whole idea.


First, I cut out the circles for the snowman body. I just walked around my house finding circle shaped items. I ended up using my wall clock, a dinner plate, and a bucket. The wall clock was a little big so I cut that one down a little bit but everything else was perfect.

For the mittens I just found a picture on Google and traced it onto the felt.

I used my Cricut to cut out the squares on the calendar and also for the "coal" circles and carrot nose. For the numbers I used that 3D fabric paint.


After everything was cut out I used my hot glue gun to glue it all on.

The stitching around the edges took the longest. Not hard at all but it is a little time consuming. FYI it's called a button-hole stitch. I found instructions on how to do it here.


The marker is just fabric, quilt batting, and stitching. Cute right?

I still haven't figured out how exactly to hang it up so any ideas from you would be great. Happy Holidays!

Saturday, November 27, 2010

Christmas Stocking Instructions

I figured I should probably post the instructions for the Christmas stockings so you can have them ready by Christmas. I will do my best at explaining as simply as I can. Once you've done one you can whip out  several with no problem. Make sure to read through the entire tutorial before you start, to avoid confusion.
You'll need:
  • Two outside pieces (I bought 1 yd because of future children. You could get by with 1/2 a yard for 1 stocking)
  • Two inside lining pieces (I would recommend felt -- it's cheap and soft)
  • Two border fabric pieces (probably 1/8 or 1/4 yard. My pieces ended up being 4" long+the width of the stocking) 
  • Bias tape (Get extra wide double fold. Easier to work with.)
    1. Start by cutting out your pieces. You can use your own pattern or email me for the one I used. Just remember, the bigger the stocking the harder it is to fill. I just cut the border piece to match the width of the stocking. Sophisticated, I know.

    2. Iron one edge of one border piece up 1/2"

     3. Sew the border pieces together at the raw edges, right sides together.

    4. Line up one felt piece and one fabric piece. Make sure the toe is pointed in the direction you want it to be when you hang it. This will be the front of your stocking. Align the border pieces' seam at the top (wrong sides together) so that the border piece is on either side of the stocking.The side you ironed should be on the inside lining. Pin and sew the ironed edge to inside lining. I kept the edge of the presser foot lined up with the edge of the fabric.

    5. Sew on bias tape to the other end of your border fabric (the part that covers the front of the stocking.) I just cut a piece long enough to match the length of the border piece. Here's how you attach the bias tape: Unfold the tape. Pin and sew the open edge of the tape to the edge of the border piece.  Again, keep the presser foot at the edge of the fabric.
    6. Roll the tape around so that the other end is on the outside. Pin and sew to the stocking. Make sure the tape covers up the sewing you just did. This is where the extra wide double fold bias tape comes in handy. There should be plenty to cover up the stitching.

    The end result should look like this.
     7. Do the same with the bias tape to the top edge of the back side of the stocking.

    Now you should have two pieces that look like this.  Let me also explain that in this tutorial I sewed on all the attachments first and then sewed the front and back pieces together. I would do it the opposite way. Sew the stocking together, unpick half way, sew on attachments, then sew back together. It just keeps it lined up better.
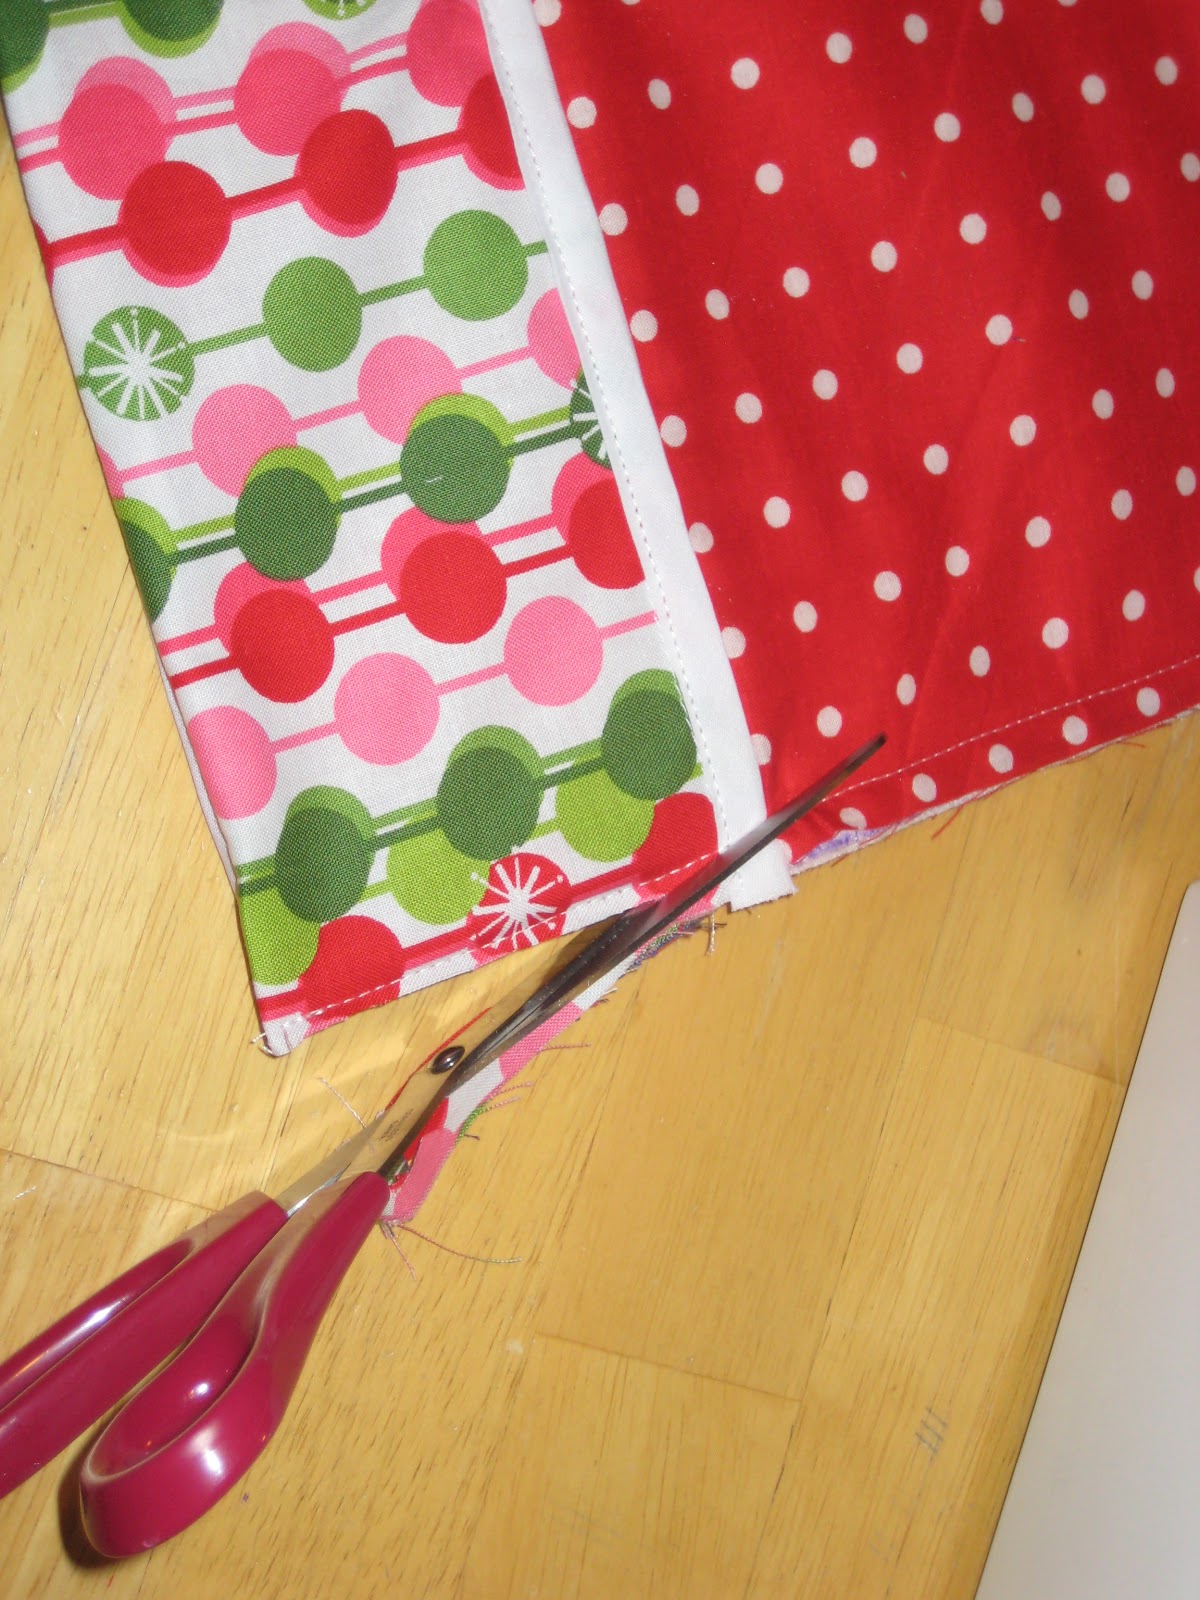
    8. Sew the front and back pieces together at a 1/2" seam with wrong sides together and cut off any excess. (You may not need to cut off the excess if you have extra wide double fold tape. FYI.)

    9. More bias tape. Same rule applies. I used 36" to go around the entire stocking. Unfold and pin to the back side of the stocking. This part is a little tricky but just work with the tape to make it align with the edge. Don't worry about the rest of it. Go slow around those curves.
    **Make sure the long end of the tape is on the opposite side you want to hang it on. Look at it from the front before you sew to make sure it looks the way you want it to.

    10. Fold over the top edge of the tape on the opposite side, just to make it look nicer when you're done.

    11. Roll the tape over to the front of the stocking. Pin and sew. You may have to fiddle with it while you're sewing to make sure you cover up the other stitches. Go slow.
    12. Fold down the long end of the bias tape to make a loop (as long as you want it to be). Sew across the tape and...Tada!

    Saturday, November 20, 2010

    Give Thanks

    This was a super fun project. And inexpensive. I bought a wood plaque ($6.99) at Roberts. Painted it brown ($1.00). Mod Podged (I already had some but you can get a small bottle for $5) some Thanksgiving paper on. Then used my Cricut for the letters and leaves. Bought some ribbon at Walmart (for 37 cents a yard) and hot glued it to the board. I had some ribbon left over and made a bow. Oh, and I also used some sand paper to even out the edges of the paper after they were all glued on. I just love it so much! I only have a week to enjoy it though...
    Total cost: $8.36  (if you buy Mod Podge it would be about $14)

    Saturday, November 13, 2010

    Wall Clock

    I did this project at a Super Saturday today. I can tell you the steps I went through to make it.
    1. Paint clock front and sides with brown acrylic paint. I did 2 coats. Let it dry completely.
    2. Apply layer of crackle medium. The thicker the layer, the bigger cracks you'll have. Dry completely.
    3. Apply layer of cream acrylic paint. Get a good glob on your brush and cover one section at a time. As it dries it will crackle. Don't paint over anything that has crackled -- it will just cover it up. Dry completely.
    4. Stain the crackled paint with a mixture of the brown paint and a little water with a rag (the girl at the thing used a sock) then dab over it with a dry rag (or sock) to make it even. Dry completely.
    5. Apply vinyl face (i'm not sure how she made that part) to clock, rub on. Attach hands.
    It took 3 1/2 hours because of all the drying time. And there were like a million other people needing the lady's help. It was fun though. I LOVE it!!

    Saturday, November 6, 2010

    Leaf Banner

    I needed a project for November. I don't have any Fall/Thanksgiving decorations. This might be my new favorite project (except for my Xmas stockings). Another idea I got from Studio 5. I bought some fake leaves at Roberts (they were 50% off but you could probably find them at the dollar store or walmart for even cheaper.) I cut the leaves off the stem and just sewed them together with needle and thread. Tada!

    These would be SO cute around the edge of the dinner table but Brandon would definitely tear them apart.

    Also, I think I'm going to have to make some sort of banner for every holiday. I love them!

    Saturday, October 16, 2010

    Jar-o-lanterns (haha)

    More non-scary Halloween decorations. I got this idea from Taste of Home magazine and I LOVE them. Choose jars of various sizes (I used old pickle jars). Brush a coat of Mod Podge on the jar. Then cover the entire jar, including neck and bottom, with layer of tissue paper. I would recommend covering half the jar rather than the whole jar. Easier to work with. Slather the tissue paper with another layer of Mod Podge. You can wrap ribbon around the neck but I didn't have any. I got the faces from tasteofhome.com/lantern or you can make your own. Cut them out and use more Mod Podge to attach them to the jar. I bought some battery-operated tea lights at Walmart for $2.50 to put inside. Or you could fill them with candy. Cute right? This was a very cheap project. I think I will make some for Christmas too!

    Wednesday, October 13, 2010

    Cupcake-Liner Banner

    Another good crafting find from Stuido 5. When I saw this on Studio 5 I immediately fell in love with the idea. Halloween is my least favorite holiday and I have to endure all its elements for 31 days. I have ZERO Halloween decorations but I will gladly decorate my house with non-scary things.

    This was SO easy. I bought a 96-piece package of Halloween cupcake liners at Joann's for like $2.50. I got the instructions from this website. "Begin by cutting two liners (back to back) like a sun so that the liners will lie flat. Once cut, put the two liners back to back and run them through your sewing machine. Continue sewing them on until your banner is as long as you want it"

    Monday, October 11, 2010

    Christmas Stockings

    They're done! I can't believe I made these. It was hard work and they're definitely not perfect, but I'm so glad I did it. I just want to skip over Halloween and Thanksgiving so I can hang these up! I'll work on blogging the instructions for those who are interested. Go me!


    Saturday, October 9, 2010

    Iron-on Letters

    As an early Christmas gift, my parents bought me a Cricut! I've had lots of fun experimenting with it. I remember seeing on that Cricut infomercial a few years ago that you can cut fabric with the Cricut. So cool. I wanted to use it to cut out the letters for our names to go on our Christmas stockings (See below)....
    You will need:
    1) Fabric: Any cotton fabric should do. To save you any of the blood sweat and tears I went through make sure NOT to get the little fabric samples. There's a reason they are samples--they're flimsy and they DO NOT work on the Cricut. Get the fabric FROM THE SHELF! Even if you don't feel like going to the counter and getting it cut.
    2) Iron-on Adhesive: Again, listen to Brittany. This will save you many tears. I bought some Steam-a-seam iron-on adhesive that I saw a girl use in a YouTube video. This is no good. You need to get Heat'n Bond. Seriously, so many tears.

    And 3) Cricut.

    Instructions:
    Cut the desired size of fabric and cut the same size of iron-on. Iron adhesive to fabric according to directions (fabric side down; iron for a few seconds).
    Adhere fabric to mat. I used blue painters tape to keep the fabric from slipping. Works well. Adjust pressure settings to the highest and adjust the speed to 1 or 2.
    Cut your fabric. You may have to snip a few parts of the letter that didn't cut all the way through. Shouldn't be too bad.
    Then iron the letters to your project and...VOILA!

    And you don't HAVE to have a Cricut to do this. You can trace letters on to the paper backing of the iron-on and use scissors to cut them out. It just won't look as neat as the Cricut cut-outs and will take longer.

    Friday, September 24, 2010

    Cutting Board

    Homemade Rattle

    I got this idea from another family in church. Their little girl was playing with an old medicine bottle filled with beads. They were nice enough to let Brandon play with it and he loved it. I decided to make one for Brandon. Only I filled it with rice instead of beads. Quieter for church.

    Frame

    I used some scrapbook paper to cover the boring white part of this picture frame. It's so cute now!!

    Light switch cover

    You can get the tutorial here. Oh, and it doesn't really explain how to cut the holes for the light switch and screw holes. Use a seam ripper.

    Brandon

    Just made of scrapbook paper. I used a saucer plate to trace the blue circle. Then found a picture of a star on google and traced it from my computer screen. There ya go!

    Xmas PJs

    The Living Christ

    Made for my mother and father-in-law

    Homemade Christmas ornaments

    Homemade Christmas ornaments made out of scraps of paper and glitter glue.