Friday, December 21, 2012

Baby Food jar Snowmen

I got the idea for this on Pinterest. It was super easy.  A little time consuming since these are our neighbor gifts this year and I made 10 of them. But it was totally worth it. I would have done a third jar filled with crushed peppermint candies but it would have taken like 10 candy canes per jar. Not gonna happen.

Lots of hot glue for these. I just used paper for the hat and scarf. I used acrylic paint for the face.


Tuesday, December 11, 2012

The stockings were hung...

I don't have a mantle and nothing cute to display our stockings on. I'm sure some of you have seen this floating around on Pinterest. It totally spoke to me.

I used that pencil stencil technique again here and used a black sharpie to color in the letters.
Then I got some cabinet knobs at Walmart (two for $2) and hot glued them to the board. (I wanted the option of removing them in case our family grows).


Nativity Board

Do you remember this Christmas board make-over I did last year? Yeah, it's cute and all but it wasn't doing it for me this year. I don't have a nativity at all and I wanted a way to display it without having to worry about losing any of the pieces over the years.

An idea I got from Pinterest here  helped me accomplish this.

I used Google to help me find silhouette Nativity images and printed them. Then I had to cut them out by hand onto white contact paper. (I would not recommend cutting this many detailed images by hand...)


 I also learned a great trick through Pinterest (can't find the source though) that has opened up a whole new world of crafting for me. Pencil transfer stencil is a good name for it, I think.

First, print out your desired phrase and font and cut out

On the reverse side, color over the words with pencil

Lay your phrase on your project and trace over the letters

The pencil scribbles on the back get transferred onto your project!

I used glitter gold 3D Paint over my letters. SO pretty!

Sunday, November 25, 2012

Fleece tree skirt

I've been wanting to make a tree skirt for a long time. I heart Pinterest for giving me some ideas. I found this cute little tutorial here and knew I could do it! She uses an already made fleece throw from Wal Mart and I was planning on doing that but in the fabric section at walmart I found a piece of "Fleece remnant" as they called it for $1.75 that was the perfect size. I bought 2 yards of the pom-pom trim for $2.50 (I should have gotten 2.5 yards) and decided to hot glue it to the fleece. I also decided to sew on some bias tape to the circle in the middle to make it look nicer. Otherwise this would have been a no-sew project.

 I love it so much!!!!!


Wednesday, November 7, 2012

Halloween Costumes

I made Brandon and Katy's costumes this year and it was so fun! Brandon was a pumpkin (tutorial here) and Katy was a ghost (tutorial here and here for the tutu). I would recommend the Make it and love it tutorial for the amount of tulle you need and the other link for instructions.


Thursday, October 4, 2012

Rag Doll

Katy's birthday is coming up and I wanted to get her a doll for her birthday but I couldn't find the type of doll I was looking for. Per inspiration of my sister Alecia (thanks, leash!) I decided to make Katy a doll. I found a tutorial and pattern from Martha Stewart here. I also found another tutorial for the same doll that had better step-by-step instructions here. I'll do my best to add instructions for this doll. (Mine won't be as in depth so I would look at one of the other tutorials if you plan on making this.) Oh, and for the face I got the idea for that here.

Trace the pattern piece onto a piece of flesh-colored fabric and cut out. For the arms and legs, sew right on the line...

Then cut out around the line.

Using something long and skinny, turn the arms/legs inside out

With right sides together, sew head piece to dress.
Do the same to the back


Sew hair piece to face


Make a doll sandwich (arms, legs, pigtails going toward the inside)
Pin and sew as close the edge as possible, leaving an opening at the top of the head
Find the legs and pull them through the opening


I was going to use paint for the face but then Sean reminded me that Katy puts everything in her mouth and we would hate for her to eat paint so I chose to embroider the face. If you do choose to embroider, I would do this step before sewing the doll together.

Stitch the top of the head closed (a tutorial I found for that here) and there ya go! She needed a friend so I made another one. The pink one is Katy :)

Crayon Tinted Embroidery 2

Ever since I did this crayon tinted Fall embroidery I've wanted to do the same thing to my Salt Lake Temple embroidery I did a couple of years ago. But I was afraid I would mess it up and since it took me so long to do I didn't want to risk ruining it. Until a couple of days ago. I re-did the embroidered words at the bottom and this gave me a chance to  take a stab at coloring the temple. It was scarey but I am so glad I did it! It turned out beautiful :)


Monday, September 24, 2012

Diaper Cover

Why don't they sell these in the store? I would totally buy them. But I did find some great tutorials here and here on how to make your own. So I used left over fabric from the baby skirts I made and made some matching diaper covers.

I took apart a diaper cover she already had and used that as my pattern.


These were a lot more work then I was expecting. I probably did it wrong. But I'm glad that she has some, now. Maybe I will just buy some little girl panties and use those as diaper covers next time...

Saturday, September 22, 2012

Baby Denim Skirt

If Katy's going to be wearing those leggings she's got to have some skirts to go with them. Right? Right?! I found this simple skirt tutorial here. Skirts have always been something I'm not very good at. But I knew I could do this one because it was just a rectangle piece of fabric and a casing for the elastic. I've done that tons of times.

I found some cute denim fabric at walmart and couldn't pick just one. So I got two pieces, 1/2 yard each. I mean, who has just one denim skirt? For Katy, her measurements were-- Waist: 20" Length: 10". According to the instructions, I added 8" to the waist (28") and divided by two since I was folding my fabric in half (14") and 2.5" to the length (12.5"). Both skirts ended up being a bit long so I did have to trim up the bottom but that was it! Each one took about an hour.

Voila! I may have to find some fabric scraps around the house and make more!!! This could easily be done for little girls, too!


Thursday, September 20, 2012

Baby Leggings

I always thought these were kinda funny but now that I have a daughter and it's getting colder, I'm finding that these should be a staple in her wardrobe. So cute for wearing under a dress/skirt for church and convenient for wearing around the house on a cold day.

This was a super quick and easy project. I got this great tutorial here. I bought some women's knee socks at walmart for $2 each. I wanted to get her some plain colors too and the men's sock section has a few options but they all came in a 3-pack and were a little more than I could spend at the time. Next time.


Adding the cuffs on the bottom made these a little long for her. I saw another tutorial here that shows you how to ruffle the bottom of the sock. I will be trying that next time, too. :)

Wednesday, September 19, 2012

Preschool Calendar

I didn't even need Pinterest for this one! I was creative all by myself. He loves singing the "Days of the Week" song he learned at school and I wanted a way for Brandon to visualize the days of the week. I used a magnet as a marker for the current day and I also printed out these weather images just for fun.


Number Wheel

Brandon gets a little overwhelmed with this one trying to count all those stickers. But he does like to put on the clothes pin. So I help him count and he puts the clothes pin on. Good times :) I got the idea here.


Monday, September 17, 2012

Toilet Paper Roll Crown

Toilet Paper rolls are awesome. Thank you Pinterest for this adorable idea for TP roll crowns.

Use a pencil and outline the top of the crown and cut out with scissors. I painted the inside of the roll a light pink and then painted the outside yellow. Then I added some jewel stickers all around the crown.

You're also supposed to punch two holes in the bottom and attach elastic thread around so you can wear it around your chin.

I plan on using this for Katy's 1-year pictures. Can't believe she's almost 1 already!!!


Thursday, September 13, 2012

Fall Wreath

I was inspired by this fall wreath here. I didn't have all the fancy stuff she had but I've had this plain wreath from the dollar store for like a year planning on making a fall wreath. I used the fake leaves from this project and used hot glue to attach them to the wreath. I used some old ribbon that was conveniently already tied in a bow and hot glued that on too.

It's simple but sometimes simple is better. Yay!!!


Traceable ABC/123 Book

You can buy traceable letter books on Etsy like this one but I decided to make my own. I found this website where you can download traceable font for free. I printed them off on some colored card stock and that's all I really needed. I already had some plastic photo books from the dollar store and decided to use those for this project. Then Brandon can use dry erase markers or crayons.


Saturday, September 8, 2012

No-Sew Quiet Book for Church

This was SOOOO fun to make. I'm kinda sad it's finished. I worked on it constantly for like 3 days straight. Can't wait to take it to church tomorrow! I got the idea here. Most of these I found for free online and printed off. So awesome. I found these mini velcro dots that I love because they don't cover up the pictures and they're quieter than the bigger velcro dots. AND you can reposition them if you mess up. That's probably the best part.


Puzzle of Jesus from a magazine picture.

Noah's Ark animal matching. This was the only one I had to buy. I got it for $1 here.


CTR color matching

Garden of Eden. Love this one! Got the download here.

Armor of God. I think this is my favorite! Got the idea and download here. I got the background here.

All dressed up :)

Temple puzzles

Creation matching game. Found here.

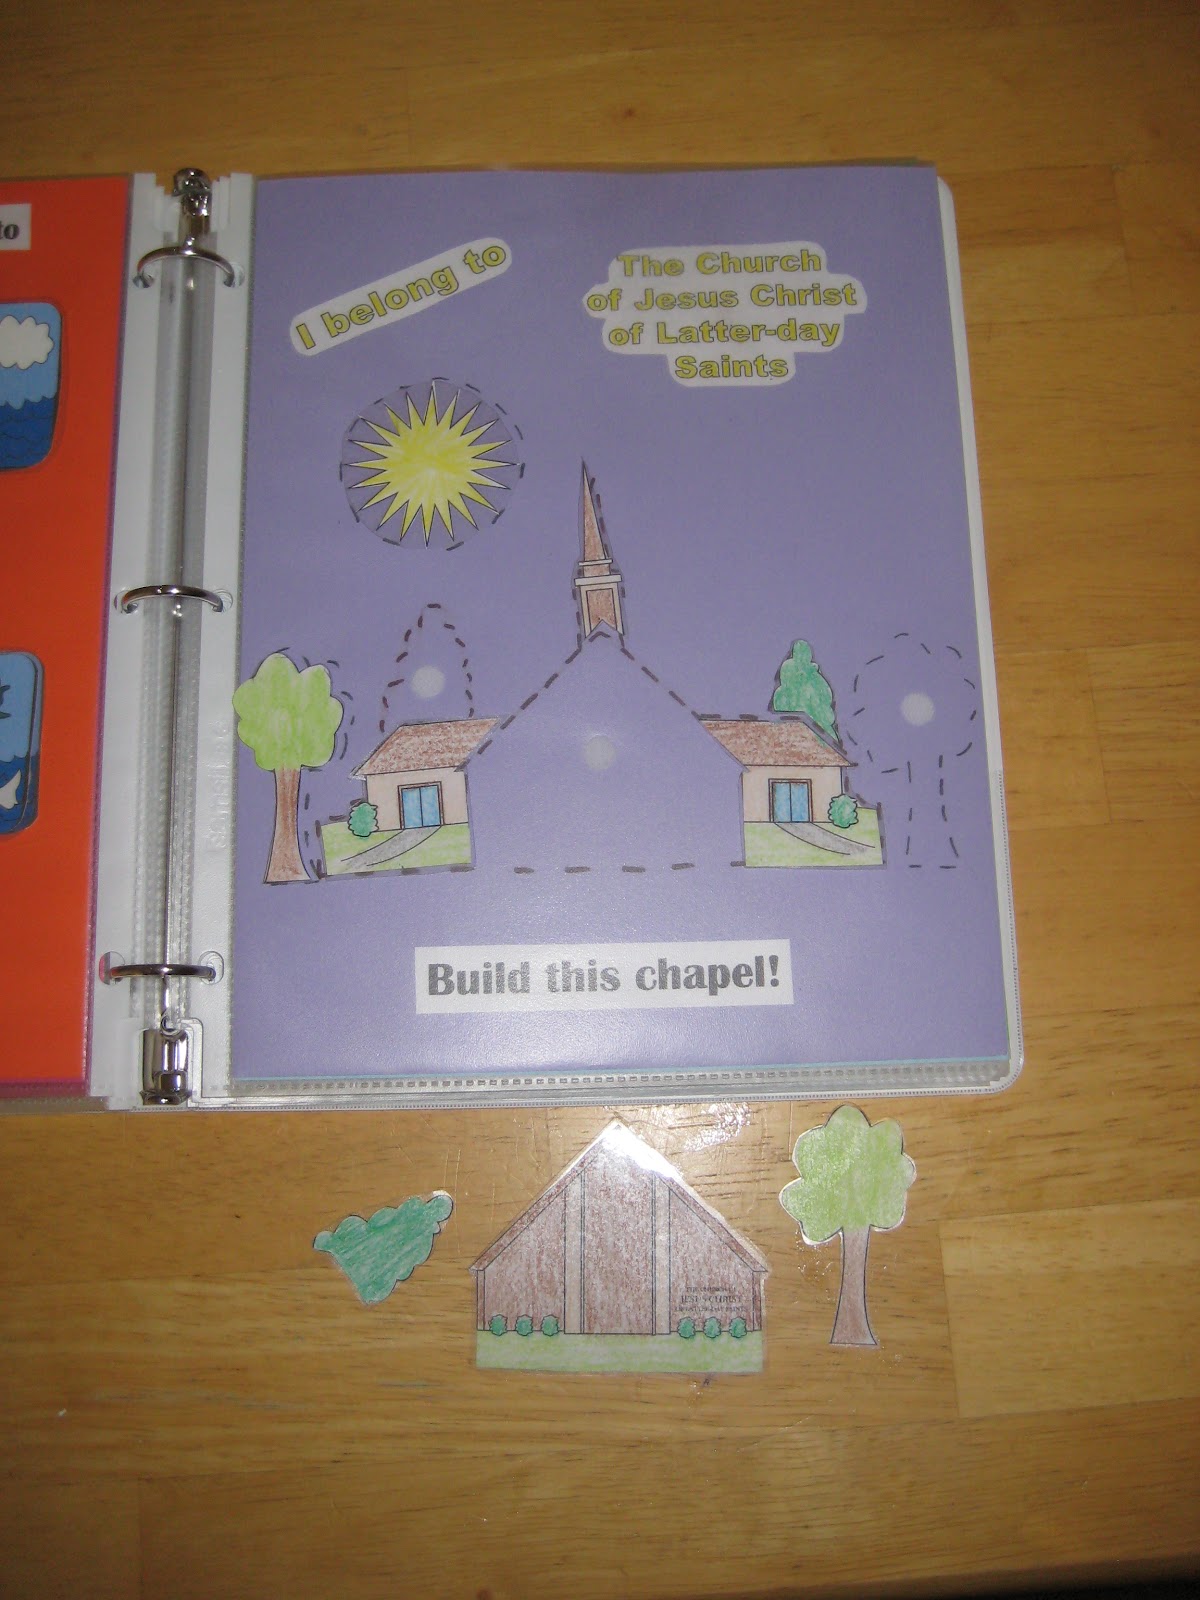
Build a chapel puzzle.

Plan of Salvation. Got the download here.

Commandment Cones with corresponding commandment on back. Used my Cricut for these.

Stories of Jesus shape matching. Got the pictures here and here.

I keep all the pieces in a plastic baggie and store it inside the sheet protector.