
Saturday, October 16, 2010
Jar-o-lanterns (haha)
More non-scary Halloween decorations. I got this idea from Taste of Home magazine and I LOVE them. Choose jars of various sizes (I used old pickle jars). Brush a coat of Mod Podge on the jar. Then cover the entire jar, including neck and bottom, with layer of tissue paper. I would recommend covering half the jar rather than the whole jar. Easier to work with. Slather the tissue paper with another layer of Mod Podge. You can wrap ribbon around the neck but I didn't have any. I got the faces from tasteofhome.com/lantern or you can make your own. Cut them out and use more Mod Podge to attach them to the jar. I bought some battery-operated tea lights at Walmart for $2.50 to put inside. Or you could fill them with candy. Cute right? This was a very cheap project. I think I will make some for Christmas too!

Wednesday, October 13, 2010
Cupcake-Liner Banner
Another good crafting find from Stuido 5. When I saw this on Studio 5 I immediately fell in love with the idea. Halloween is my least favorite holiday and I have to endure all its elements for 31 days. I have ZERO Halloween decorations but I will gladly decorate my house with non-scary things.
This was SO easy. I bought a 96-piece package of Halloween cupcake liners at Joann's for like $2.50. I got the instructions from this website. "Begin by cutting two liners (back to back) like a sun so that the liners will lie flat. Once cut, put the two liners back to back and run them through your sewing machine. Continue sewing them on until your banner is as long as you want it"


This was SO easy. I bought a 96-piece package of Halloween cupcake liners at Joann's for like $2.50. I got the instructions from this website. "Begin by cutting two liners (back to back) like a sun so that the liners will lie flat. Once cut, put the two liners back to back and run them through your sewing machine. Continue sewing them on until your banner is as long as you want it"


Monday, October 11, 2010
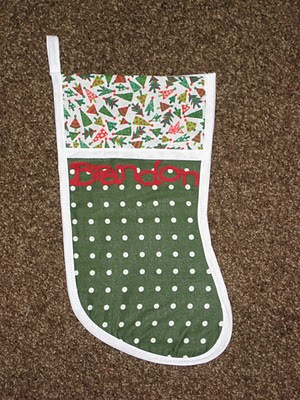
Christmas Stockings
They're done! I can't believe I made these. It was hard work and they're definitely not perfect, but I'm so glad I did it. I just want to skip over Halloween and Thanksgiving so I can hang these up! I'll work on blogging the instructions for those who are interested. Go me!


Saturday, October 9, 2010
Iron-on Letters
As an early Christmas gift, my parents bought me a Cricut! I've had lots of fun experimenting with it. I remember seeing on that Cricut infomercial a few years ago that you can cut fabric with the Cricut. So cool. I wanted to use it to cut out the letters for our names to go on our Christmas stockings (See below)....
You will need:
1) Fabric: Any cotton fabric should do. To save you any of the blood sweat and tears I went through make sure NOT to get the little fabric samples. There's a reason they are samples--they're flimsy and they DO NOT work on the Cricut. Get the fabric FROM THE SHELF! Even if you don't feel like going to the counter and getting it cut.
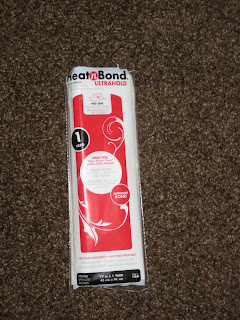
2) Iron-on Adhesive: Again, listen to Brittany. This will save you many tears. I bought some Steam-a-seam iron-on adhesive that I saw a girl use in a YouTube video. This is no good. You need to get Heat'n Bond. Seriously, so many tears.
 And 3) Cricut.
Instructions:
Cut the desired size of fabric and cut the same size of iron-on. Iron adhesive to fabric according to directions (fabric side down; iron for a few seconds).
Adhere fabric to mat. I used blue painters tape to keep the fabric from slipping. Works well. Adjust pressure settings to the highest and adjust the speed to 1 or 2.
Cut your fabric. You may have to snip a few parts of the letter that didn't cut all the way through. Shouldn't be too bad.
Then iron the letters to your project and...VOILA!

And you don't HAVE to have a Cricut to do this. You can trace letters on to the paper backing of the iron-on and use scissors to cut them out. It just won't look as neat as the Cricut cut-outs and will take longer.
You will need:
1) Fabric: Any cotton fabric should do. To save you any of the blood sweat and tears I went through make sure NOT to get the little fabric samples. There's a reason they are samples--they're flimsy and they DO NOT work on the Cricut. Get the fabric FROM THE SHELF! Even if you don't feel like going to the counter and getting it cut.
2) Iron-on Adhesive: Again, listen to Brittany. This will save you many tears. I bought some Steam-a-seam iron-on adhesive that I saw a girl use in a YouTube video. This is no good. You need to get Heat'n Bond. Seriously, so many tears.

Instructions:
Cut the desired size of fabric and cut the same size of iron-on. Iron adhesive to fabric according to directions (fabric side down; iron for a few seconds).
Adhere fabric to mat. I used blue painters tape to keep the fabric from slipping. Works well. Adjust pressure settings to the highest and adjust the speed to 1 or 2.
Cut your fabric. You may have to snip a few parts of the letter that didn't cut all the way through. Shouldn't be too bad.
Then iron the letters to your project and...VOILA!

And you don't HAVE to have a Cricut to do this. You can trace letters on to the paper backing of the iron-on and use scissors to cut them out. It just won't look as neat as the Cricut cut-outs and will take longer.
Subscribe to:
Posts (Atom)