I've always wanted to know how to make binding. Bias tape is great but they're only in plain colors and sometimes you want a little something extra for the binding. Thanks to my mom for helping me put this blanket together for Brandon!
I found two tutorials that were very helpful
here and
here. Now that I've given them credit, I'm going to combine the two tutorials here for my own sake.
Making the binding
First, I cut my fabric into 2.25" strips. (I wish I had a rotary cutter!!)
Take one end of each strip and cut it at a 45 degree angle. (I did this by measuring 2.25" from the end and drawing a line from there to the top corner.)
Line the ends up, right sides facing, allowing for a 1/4"
overlap. Note the asterisk markings for your beginning and ending stitch
line.
Using a short stitch length of 2 or less, stitch 1/4" seam.
Clip excess.
Press open
Continue until you have attached them all (or as many as needed).
Then you need to press then entire strip evenly in half like this:
Attaching the binding:
It's helpful to lay the binding all around the perimeter of the quilt,
ensuring that no binding seams fall where you will be mitering corners.
It's not the end of the world if that happens, but avoiding it will
make smooth even binding.
Leaving an 8" tail, line up the binding's raw
edge with the outer raw edge of the quilt using a 1/4 inch seam\
Stop 1/4" from the corner. be precise here.. mark it if you have to... it'll make things perfect.
Fold binding over itself 90 degrees...
basically opposite of where you want to sew it to next.
Then fold it back to look like this.
Then turn the quilt and stitch again at a 1/4 inch seam from the top
edge, all the way down until you are 1/4 inch shy of the next end.
Repeat. You just mitered your binding. EASY.
Joining Binding:
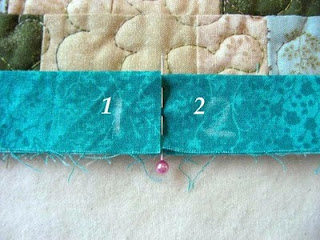
When you are about 12 inches away from where you started, stitch off. You should have 2 tails like this.
You cut off tail 1 not any shorter than the half way point between the two tails (6 inches)
Now lay tail 1 on top of tail 2 and mark tail 2 with a pin or marking device right where tail 1 ends.
Mark a vertical line exactly two inches (or the width of your open
binding strip) longer, to the left of the pin on tail 2. Cut vertically
there. This will create an overlap identical to the width of the
actual strips when they are open.
In order to connect the tail ends, you will need to bunch up the quilt
for ease. With
right sides facing, match up the front corner of tail 1 with the back
corner of tail 2.
The asterisk in the diagram marks the matched corner.
Pin.
Draw a diagonal line as your guide, from
unmatched corner to
unmatched
corner. Stitch along this line with the pin to the right.
Clip off the pinned corner, leaving a 1/4 inch seam allowance. Press seam open.
Now you can continue stitching the binding on at 1/4 inch seam. Just overlap from where you left off.
The binding should lay perfectly flat on the quilt.
Now look what happens when you press all the binding back!
Both of these tutorials used handstitching to attach the binding to the other side of the quilt. I always feel like machine stiching is so much more secure, but the stitching does show through on the other side. So, it's up to you. I chose to use my machine. But to make the corners after folding the binding over, just do a little tucking and folding to make it look right.
So there ya go! Hope it helps. I will be referring to this for my next blanket project!


